Waterfall tutorial
Oct 8, 2014 14:57:29 GMT -5
Post by GaliWalker on Oct 8, 2014 14:57:29 GMT -5
At some point I was asked to provide a tutorial on how I take some of my waterfall photos. In answer, I wrote up a few thoughts on how I approach this, with an example photo to illustrate these. While this will most likely be nothing new for quite a few people, hopefully some find it useful...
- Waterfall photos are impossible to take when there are high contrast situations. I don’t bother with waterfall photography when the sun starts to hit the water. So the first step to be successful is to get there early in the morning or late in the evening, or on a cloudy day.
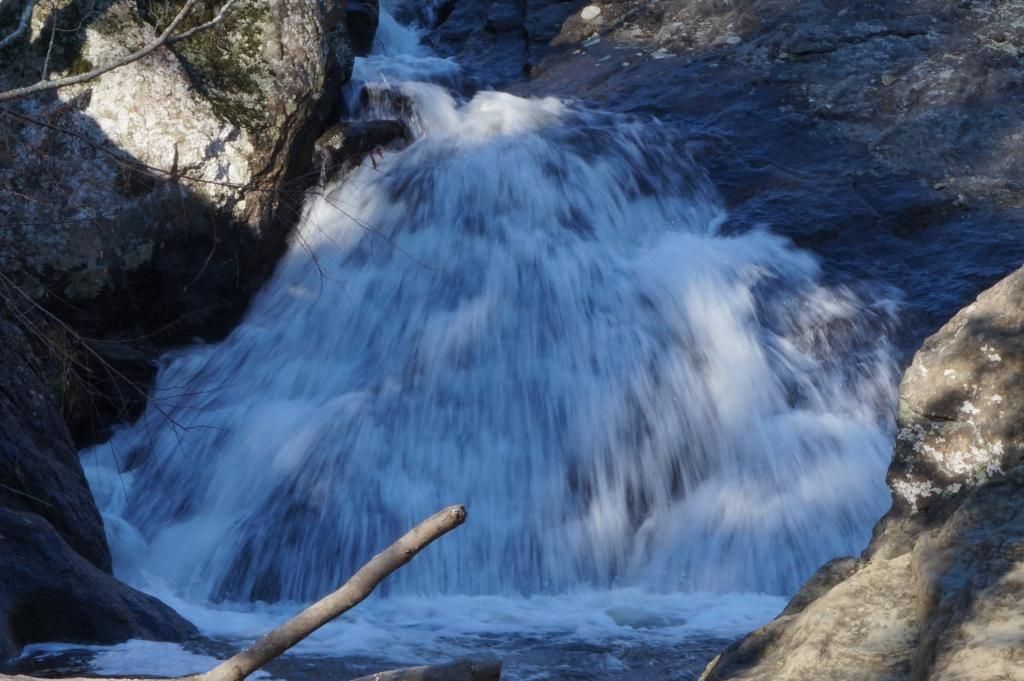
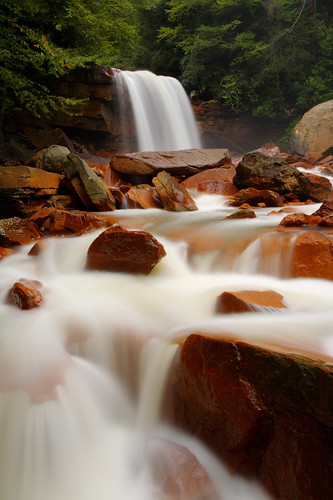
- Once I get to my location I start to look around to identify what defines the spot. Usually, this is the first thing that makes me go wow; the harder task is to identify exactly what made me go wow. For Douglas Falls the gorgeous red rocks were the obvious choice.
- Now that I had the main theme identified, I set about looking for smaller details that enhance this theme; that sell it in a non-obvious, non-documentary way. In the photo above, I spotted a lovely little cascade amongst the rocks. I decided to make this a feature, which would allow me to offset the red rocks by white water, drawing out even more of the color.
- Ok, now that I knew what type of shot I wanted to try, the next step was to get in position. This involved a bit of slick scrambling on wet, slippery rocks. Once I got into position, I was gratified to see that the photo I’d seen in my mind would in fact be possible to take. The takeaway here is to see the shot before you ever lift the camera up.
- Up to this point was the fun part of photography for me – the thinking part. The rest was more mechanical:
- I set up the tripod, really close to the cascade. I wanted to ensure that the cascade was front and center, so that the waterfall and cascade do not compete more than they should. For a successful photo the eye needed to fall on the cascade first, and then be led to rest on Douglas Falls. An unsuccessful photo would have the eye fall on the main subject first and then either leave it to wander elsewhere, or just get stuck there, having missed out on the other things in the frame. There should be only one main subject, and the rest should be designed to lead the eye to this naturally.
- Since I wanted a great depth of field (everything in focus from foreground to background), I set the aperture to F/22. I also used a wide angle lens.
- I rotated the polarizing filter until most of the reflections in the water were removed, since I wanted a clean, uncluttered look.
- I set the shutter speed to 5 sec, for a proper exposure (anything longer than 1 sec would have been fine for this shot). The ISO speed was 100. My camera allows me to go down to ISO 50, but it wasn’t bright enough yet to require me to cut any more light.
- To prevent camera shake I used a remote release. If you don't have this, try and use the timer; this will prevent camera shake due to having to manually depress the shutter.
- I took a test shot and checked the histogram to ensure that my exposure was correct, adjusting as necessary. Note that if you shoot in Raw, you can recover some details in the shadows, but none in blown highlights, so make sure that there is no clipping of the histogram on the right side.
- And that was mostly it. I don’t do much post-processing, since most of the work has already been done. Maybe some exposure tweaks, but not much more. e.g. Almost no blending of multiple photos (which I find unnatural in the majority of cases, especially for waterfall photography), no addition/removal of anything other than sensor dust spots. For landscape shots, this last bit is an ethical no-no for me.
- Waterfall photos are impossible to take when there are high contrast situations. I don’t bother with waterfall photography when the sun starts to hit the water. So the first step to be successful is to get there early in the morning or late in the evening, or on a cloudy day.
- Once I get to my location I start to look around to identify what defines the spot. Usually, this is the first thing that makes me go wow; the harder task is to identify exactly what made me go wow. For Douglas Falls the gorgeous red rocks were the obvious choice.
- Now that I had the main theme identified, I set about looking for smaller details that enhance this theme; that sell it in a non-obvious, non-documentary way. In the photo above, I spotted a lovely little cascade amongst the rocks. I decided to make this a feature, which would allow me to offset the red rocks by white water, drawing out even more of the color.
- Ok, now that I knew what type of shot I wanted to try, the next step was to get in position. This involved a bit of slick scrambling on wet, slippery rocks. Once I got into position, I was gratified to see that the photo I’d seen in my mind would in fact be possible to take. The takeaway here is to see the shot before you ever lift the camera up.
- Up to this point was the fun part of photography for me – the thinking part. The rest was more mechanical:
- I set up the tripod, really close to the cascade. I wanted to ensure that the cascade was front and center, so that the waterfall and cascade do not compete more than they should. For a successful photo the eye needed to fall on the cascade first, and then be led to rest on Douglas Falls. An unsuccessful photo would have the eye fall on the main subject first and then either leave it to wander elsewhere, or just get stuck there, having missed out on the other things in the frame. There should be only one main subject, and the rest should be designed to lead the eye to this naturally.
- Since I wanted a great depth of field (everything in focus from foreground to background), I set the aperture to F/22. I also used a wide angle lens.
- I rotated the polarizing filter until most of the reflections in the water were removed, since I wanted a clean, uncluttered look.
- I set the shutter speed to 5 sec, for a proper exposure (anything longer than 1 sec would have been fine for this shot). The ISO speed was 100. My camera allows me to go down to ISO 50, but it wasn’t bright enough yet to require me to cut any more light.
- To prevent camera shake I used a remote release. If you don't have this, try and use the timer; this will prevent camera shake due to having to manually depress the shutter.
- I took a test shot and checked the histogram to ensure that my exposure was correct, adjusting as necessary. Note that if you shoot in Raw, you can recover some details in the shadows, but none in blown highlights, so make sure that there is no clipping of the histogram on the right side.
- And that was mostly it. I don’t do much post-processing, since most of the work has already been done. Maybe some exposure tweaks, but not much more. e.g. Almost no blending of multiple photos (which I find unnatural in the majority of cases, especially for waterfall photography), no addition/removal of anything other than sensor dust spots. For landscape shots, this last bit is an ethical no-no for me.